
List of Services
-
Eight Bottles, a Homemade Riddling Rack and a Cup of Frozen Vodka
I made a tiny batch of traditional-method sparkling cider: four bottles of apple and four bottles of pear. After a second fermentation in the bottle, eight weeks in the cellar and four weeks of hand riddling, it was finally time to freeze the necks and disgorge them. Here is what I did, what worked and what surprised me.
-
I went to cider school in the UK 🍎List Item 1
A peek inside my UK cider course: fermentation, faults, field trips, fascinating people, and the reminder that cider has both guardrails and plenty of room for creativity.
-
Why I'm apprenticing at a breweryList Item 2
From basement cider to brewery floors: why I wanted hands-on experience with tanks, transfers, cleaning systems, and the realities of production at scale.
-
Why ciderList Item 3
How I went from cider fan to Certified Pommelier, basement experimenter, and someone who would really like Louisville to become more of a cider town.
Eight Bottles, a Homemade Riddling Rack and a Cup of Frozen Vodka
I love a good Prosecco. It is often my go-to, especially when I do not know exactly what I want and the choices are limited.
Most Prosecco is actually carbonated using the tank method rather than the traditional method, but drinking all those bubbles still made me curious: Could I make a traditional-method sparkling cider myself?
It sounded like a good idea.
It also sounded incredibly intimidating.
There is a second fermentation inside the bottle. There is riddling. There is freezing. There is disgorging—which involves opening a highly pressurized bottle and intentionally allowing some of its contents to shoot out.
I decided to start small: four bottles of apple cider and four bottles of pear cider. It was just enough to experience the entire process without committing to a cellar full of sparkling cider.
There was also a practical reason for the small batch. If you have never tried to buy pressure-rated sparkling-wine bottles, it turns out they are expensive to ship.
So I saved my Costco Prosecco bottles until I had eight.
A beverage and a reusable bottle for about $7 each. Not a bad deal.
What is the traditional method?
The traditional method—sometimes called the Champagne method—is a way of creating sparkling wine or cider by producing the carbonation inside the bottle.
Rather than injecting carbon dioxide from a tank, the maker adds a carefully measured amount of sugar and yeast before bottling. The yeast consumes the sugar, producing a little more alcohol and a lot of carbon dioxide.
Because the bottle is sealed, the carbon dioxide cannot escape. Instead, it dissolves into the cider and creates the bubbles.
This second fermentation also leaves spent yeast, called lees, inside the bottle. Riddling gradually moves that sediment into the neck so it can be removed through a process called disgorging.
It is a bunch of work.
It is also extremely satisfying.
Starting with dry cider
I began with two separate one-gallon batches: one apple and one pear.
I fermented both batches completely dry before beginning the sparkling process. This was important because I wanted to know exactly how much fermentable sugar was going into the bottles. Any remaining sugar from the original fermentation could have created additional—and potentially unsafe—pressure.
To each dry gallon, I added:
- 1 gram of EC-1118 yeast
- 80 grams of cane sugar, dissolved in water
EC-1118 is a Champagne yeast commonly used for sparkling wine and cider. It is a strong, reliable fermenter and can continue working under the increasingly difficult conditions inside a pressurized bottle.
Once the yeast and sugar were thoroughly mixed into the cider, I filled four sparkling-wine bottles from each batch and sealed them with crown caps.
This amount of sugar creates significant pressure. Only bottles and closures specifically designed and rated for sparkling beverages should be used. Regular still-wine bottles are not built to safely contain this level of carbonation.
Because I was reusing Italian Prosecco bottles, I also had to change the bell on my capper and purchase larger crown caps that fit those particular bottles.
Reusing bottles requires some care. They should be thoroughly inspected for chips, cracks or other damage, and the closure must fit correctly. When in doubt, use new pressure-rated bottles made specifically for sparkling beverages.
Eight weeks in the cellar
I placed the bottles on their sides in my cellar and left them there for eight weeks.
A longer aging period could have developed more flavor from the cider’s contact with the yeast. Traditional sparkling wines may spend many months—or even years—aging on the lees.
My goal was eight weeks.
It was cold in the cellar at the time, so I was aiming for enough time to allow the secondary fermentation to finish. I set a reminder in my phone and was extremely excited when it finally told me it was time to check the sparkling cider.
During those eight weeks, the yeast consumed the added sugar, creating carbonation inside each sealed bottle. A layer of sediment gradually formed along the side of the glass.
The bubbles were in there.
Now I had to get the yeast out.
Time to riddle.
My homemade riddling rack
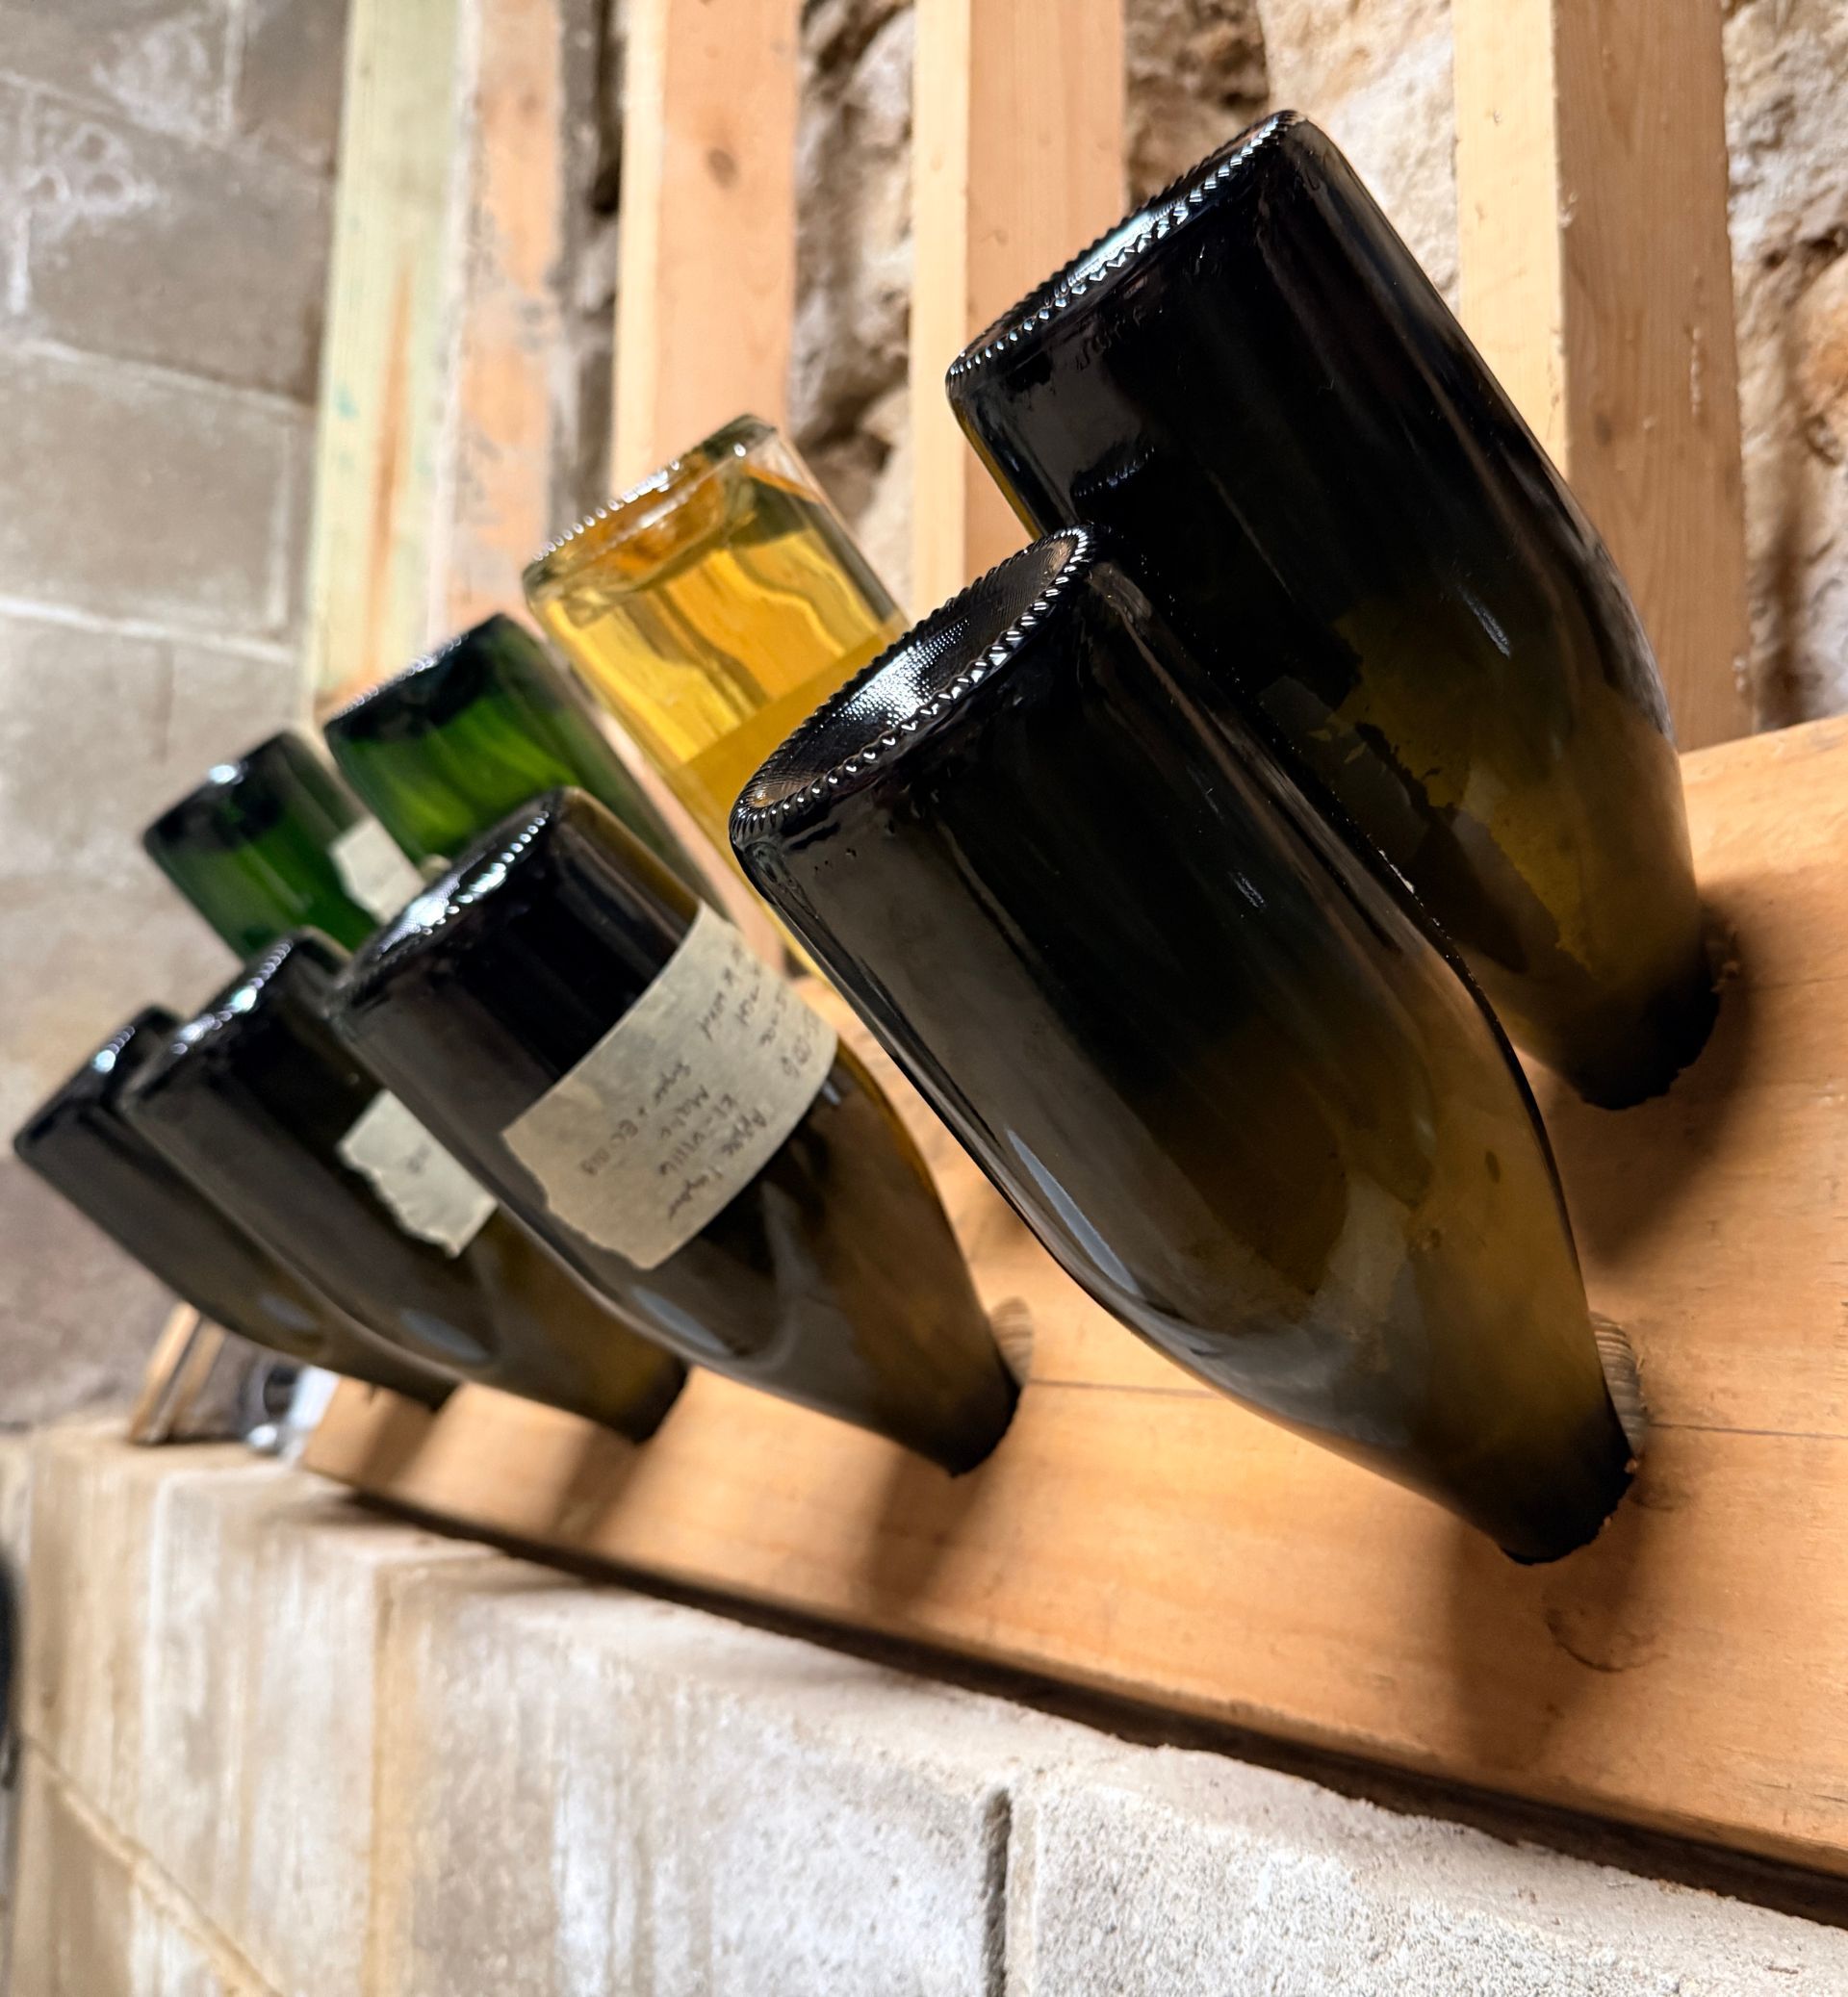
After eight weeks, I moved the bottles into my homemade riddling rack.
When I say homemade, I mean homemade.
We used a hole saw to drill eight holes into a 2-by-8 board at approximately a 45-degree angle. It required considerably more effort than we expected. I got sweaty.
Riddling slowly moves the yeast sediment from the side of the bottle down into its neck. The bottles gradually shift from a more horizontal position toward an upside-down position while being rotated regularly.
I gave each bottle approximately a quarter turn every day for four weeks.
The turning helps loosen the yeast from the glass. Gravity then encourages it to slide toward the closure. By the end of the four weeks, the sediment had collected in the necks of the bottles near the caps.
Professional riddling can be much more precise. My version involved a homemade board bracketed to the wall, daily quarter turns and a can-do attitude.
It worked.
Getting everything cold
Before disgorging, I placed the bottles upside down in a cardboard wine box in the refrigerator for a couple of days.
Keeping the bottles upside down helped the collected sediment remain in the neck. Getting the cider very cold was also important. Cold liquid holds carbon dioxide more effectively, which helps reduce foaming and cider loss when the bottle is opened.
To freeze the necks, I used a stainless-steel cocktail shaker filled with inexpensive vodka.
Vodka stays liquid at a lower temperature than water, making it useful as a very cold freezing bath. I placed the vodka-filled shaker in my deep freezer overnight.
The next morning, I moved the shaker to the refrigerator and placed the neck of one bottle into the cold vodka. I left it there for approximately 45 minutes to an hour.
The goal was to freeze the cider and yeast sediment inside the neck into one small plug without freezing the rest of the bottle.
Disgorging the bottles
Once the sediment plug was frozen, it was time to disgorge.
I used a disgorging key, a small tool designed to remove the crown cap from a sparkling bottle while giving the user a little more control.
I chose a spot immediately outside my basement door, where I was surrounded by brick and conveniently close to a floor drain.
Just in case.
I had watched a couple of disgorging videos, so I knew to rotate the bottle upward as I opened it. The idea was to allow the air bubble inside the bottle to reach the frozen plug right as I removed the cap.
I would like to credit my excellent bottle positioning, but I think the pressure inside the bottle did most of the work.
Pop.
Sediment gone.
Sparkling cider still in the bottle.
I expected the process to be messier and more dramatic. So did everyone else, because disgorging was the part nearly everyone asked me to record.
There was certainly pressure, but because the bottles and cider were thoroughly chilled, I lost very little liquid.
Attempting to add a dosage
After disgorging, I attempted to top up the bottles with a small amount of chilled juice.
They did not really need the extra volume, but I wanted to add back a touch of sweetness.
This proved more difficult than the disgorging.
First, I tried pouring the chilled juice directly into the bottle. It foamed and overflowed.
Then I tried using a pipette, placing it as far inside the bottle as possible and attempting to “inject” the juice. It still overflowed.
With the final two bottles, I added only a teeny-tiny amount at a time. The bubbles rose partway into the pipette, but I eventually managed to get a few drops of juice into each bottle.
Success, technically.
The finished bottles were sealed with new crown caps and returned to the refrigerator.
I believe all of the yeast was ejected, but because the juice contains fermentable sugar, keeping the finished bottles cold was important. Any sugar added after disgorging can potentially restart fermentation and create additional pressure unless the cider has been stabilized or otherwise processed to prevent it.
What surprised me
The biggest surprise was how manageable the entire process felt.
Before trying it, disgorging seemed like a highly technical procedure. I was convinced I would make a giant mess.
There are certainly more precise and efficient ways to do it, but a very small test batch was possible with a homemade riddling rack, a refrigerator, a deep freezer and a stainless-steel cup full of vodka.
The process still required planning. The bottles needed to stay cold. The sediment needed to remain in the neck. The opening had to happen quickly and carefully.
But once I had everything set up, each bottle required only a few minutes of active work.
The more difficult part was waiting.
Would I do it again?
Absolutely.
Traditional-method cider is not the simplest way to add bubbles. Force carbonation is faster. Basic bottle conditioning requires much less handling. Pét-nat cider can capture natural carbonation without riddling and disgorging.
But this process offered something different.
It turned eight bottles of cider into a small experiment involving fermentation, time, gravity, pressure and a tiny frozen plug of yeast launching out of a bottle.
That is part of what I love about cider.
The process can be deeply technical, wonderfully old-fashioned and just a little bit ridiculous—all at the same time.
WATCH THE VIDEO to see the riddling, freezing and disgorging process in action.
I went to cider school in the UK 🍎
I just got back from the UK, where I took a cider and perry production course – and my brain is very full in the best possible way.
I went hoping to learn more about how cider is made, beyond making it my basement. I came back with a much deeper appreciation for just how much biology, chemistry, sensory awareness, and problem-solving live inside a glass of cider.
A few things really stuck with me.
First: cider is more technical than many people realize. There are important guardrails around fermentation, acidity, stability, and process – but there is also a lot of room for style, creativity, and individual decision-making. I loved that balance. Structure and experimentation. Best practices and personal expression.
Second: faults are fascinating. One of my favorite parts of the course was getting to smell and taste specific cider faults. That kind of sensory experience is hard to get otherwise, and it made the troubleshooting side of cidermaking feel much more real and practical. Not just theory. Actual “ohhhh, that’s what that smells like” learning.
And honestly, my favorite part may have been the people.
There were 27 of us from 8 different countries, with experience levels all over the map – from large cider companies to smaller producers to basement fermenters like me, and even a few people who hadn’t made cider yet. That mix made the course feel especially generous. Everyone brought a different perspective, and there was so much to learn from hearing how other people approach production, problems, scale, and style.
We also visited a working cidery and the NIAB research site in East Malling, which was a highlight for me. Seeing the apple gene bank, getting hands-on with fermentation work, and learning from researchers and producers in the same week was pretty special.
What I’m taking away from it all is this:
there are good guardrails for making sound cider, but there is no single right way to begin.
There are many ways to start.
Many ways to set up production.
Many ways to make something thoughtful and delicious and share it with other people.
That felt encouraging.
I’m back home with more knowledge, more questions, and even more excitement about what cider could become here – especially in places where it’s still underappreciated.
More cider notes to come.
If you want to follow along as I keep learning, experimenting, and writing about cider, you can sign up to receive emails.
Why I’m apprenticing at a brewery
I know how to make cider in my basement.
Commercial production, though? Different animal.
I wanted to better understand what happens when you move from small-scale experimentation to actual production: tanks, transfers, cleaning systems, kegs, cans, workflow, equipment choices, and all the practical realities that don’t show up in a one-gallon jug on a basement shelf.
So I got an apprenticeship at a brewery.
Part of it is curiosity. Part of it is me being a very hands-on learner. And part of it is that I want to understand what this work really asks of you – physically, operationally, and creatively.
Because it’s one thing to think, I’d love to make cider commercially someday.
It’s another to start learning what commercial production actually looks like.
I’ve wanted to get a better feel for questions like:
- What makes a setup efficient?
- What do people love about their equipment?
- What do they wish they’d done differently?
- What are the best practices that matter most?
- Where do things get harder at scale?
- What does the day-to-day work really feel like?
So far, the experience has been incredibly helpful.
It’s giving me a better understanding of the physical side of production, for one thing. This is very different from sitting in front of a computer all day, which I’ve done for years and years. There’s movement. Process. Cleaning. Repetition. Problem-solving. Attention to detail. And a whole lot of things that need to happen in the right order.
I’m also seeing something I’m always drawn to:
there are guardrails, procedures, and systems – but there’s still room for creativity.
Beer, like cider, is science and art.
That balance fascinates me.
I’m learning a lot just by being in the environment, asking questions, paying attention, and getting my hands involved. And I have a feeling this kind of learning – practical, messy, embodied, real – is going to shape how I think about cider for a long time.
Why cider
I’ve loved cider for a long time.
From my first one at New Holland Brewery in Michigan to discovering an actual cidery – Sociable Cider Werks in Minneapolis – cider has had my attention for years. I’ve made it a point to visit cideries when I travel, and I’ve now been to more than 20 cideries in 12 states.
What keeps me hooked is how much range cider has. It can be crisp, tannic, structured, funky, bright, or delightfully weird. It’s part agriculture, part science, part sensory experience, and part art. Yes, please!
I wanted to become a Certified Pommelier so I’d have the street cred to say what I’d already been thinking: some breweries that try to make a cider ... could do better.
So now I make cider in my basement too, running experiments with temperature, yeast, pitch rates, and additions that affect acid, tannin, and flavor.
And underneath all of it is one big hope:
I want cider to be a thing in Louisville, Kentucky.